Excel VBA Tutorial Chapter 5: Combining condition and repeat statements
Goal of this chapter
In this chapter we show how to combine what we have seen in the two previous chapters: condition and repeat statements. We take a whole chapter for this topic as it is crucial to understand well how to combine these simple elements to construct more complex macros.
In this chapter the VBA elements we discuss are:
- Comments
- For … Next & If… Then combined
- Objects
- Cells object
- With statement
- Constants
- Command continuation on next line
- While… Wend & Select Case combined
Example case: identify primary colours
The example we will work with are two lists of colours, the first contains the three primary colours and the second a list of random colours. We will make a macro that will indicate of each entry on the second list if a colour is primary or not. To start the example, open a new Excel workbook and enter the following data in the indicated cells of the first sheet:
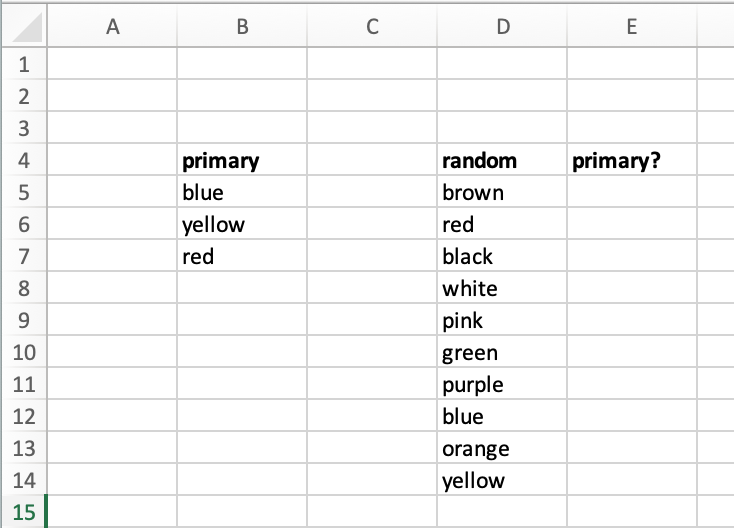
The macro will fill in column E, either “yes” or “no”, depending if the colour is in the primary colours list or not.
There are several ways we could program a solution in VBA (endless options in fact) and here we will show several forms, applying both condition and repeat statements discussed in previous chapters. In the first solution we will combine For…Next with If… Then statements.
Comments
Since the code will become more complex by this stage of the tutorial I will start using comments and shortly describe here how to use comments in Excel VBA.
Anything written in the Excel VBA editor that is preceded by an ' (apostrophe) will be viewed as commentary and not compiled as part of executable code. It is good practice to add comments to your code:
- to state first in human language what you want each part of the code to do before writing the respective code
- to help others (and yourself if you have a memory like mine) understand what your code is aimed to achieve after you have written it.
It is not necessary to explain in the comments what is on each line of code as that should be clear from the code itself. Focus on what the objective is of the piece of code. Thereby, someone else could replace that part of the code with an alternative version that achieves the same purpose.
Another benefit of using the comment apostrophe is that you can temporarily change executable code to non-executable comments while you are writing a macro or debugging an existing one. To make this process efficient with large pieces of code there are two buttons on the Edit Toolbar in the VBA editing window, called “Comment Block” and “Uncomment Block”. You select a section of code and with the help of these buttons an apostrophe will be added to or removed from the start of each line. If you do not have the Edit Toolbar in your VBA editing window, go to “View -> Toolbars -> Edit”.
Identify the primary colours with For… Next & If… Then
The way to approach the programming will be to go through the list of random colours and compare each to the three values in the primary list. In case the name of the random colour matches on of the values in the primary list then it should write “yes” in column E, otherwise “no”. Here is my VBA solution:
Option Explicit
Option Compare Text

Sub CompareWithForNextAndIfThen()

    'dimension the variables to go through the lists
    Dim RowRandom, RowPrimary As Integer

    'go through the list of random colours
    For RowRandom = 1 To 10
        'for each random colour go through the list of primary colours
        For RowPrimary = 1 To 3
            'if is a primary colour write yes and leave the For loop
            If Cells(RowRandom + 4, 4) = Cells(RowPrimary + 4, 2) Then
                Cells(RowRandom + 4, 5) = "Yes"
                Exit For
            End If
        Next RowPrimary
        'if the random colour not identified as primary then write "No"
        If RowPrimary = 4 Then
            Cells(RowRandom + 4, 5) = "No"
        End If
    Next RowRandom

End Sub
The macro starts defining two variables: RowRandom and RowPrimary that indicate the row we are in of respectively the random and primary colours. In this case we have 10 random colours, therefore RowRandom goes from 1 to 10. There are 3 primary colours, so RowPrimary goes from 1 to 3. And as the For… Next of RowPrimary is nested within the For…Next of RowRandom, RowPrimary will go from 1 to 3 for each step in RowRandom.
Here we always count the row we are in with a “+ 4” as the first primary and random colours are not in row 1, but row 5. To compensate the difference we add 4 so when RowRandom is 1 then the indicated cell is in row 5 of the sheet.
The next line opens the If statement which compares the random colour to the primary colour. If there is a match it writes “Yes” in column E. Also it executes Exit For, thereby continuing on the first line after the For… Next statement of RowPrimary (RowPrimary still has the value of the row of the primary colour, either 1, 2 or 3).
Then there is another check if RowPrimary equals 4. RowPrimary can only be 4 when its For…Next has been fully completed (that is Exit For was not been executed) and therefore the random colour did not match any of the primary colours. In this case we assign “No” to column E.
To test if the “CompareWithForNextAndIfThen” macro works press F5 while in the VBA editor, or if in the Excel worksheet ALT+F8 for Windows and Option+F8 for Mac. If you want to make running the macro more user-friendly you could add a Button or Command Button. In the following paragraphs we discuss the details of the macro that serves as our solution and how we could make it better.
Objects
VBA is an object based programming language. Before we go any further we need to pay some attention to what this means for the way Excel VBA works.
An object is a pre-defined entity with its own characteristics and methods (actions). The objects we have seen in Chapter 1 are Activesheet, Range and Selection. Whenever you use an object, you first write the name of the object, then a dot followed by the characteristic or method you want to refer to. A characteristic can sometimes be an object on itself, like the ranges or cells in a worksheet. Some examples:
- Range(“B3”).Select (object is range(“B3”) the method (action) is to select)
- Sheet1.Range(“B3”).Value (object is Range(“B3”)of Sheet1 and we want to refer to the value it contains)
- Sheet5.Cells(5,5).ClearContents (object is the cell in row 5, column 5 of Sheet5 and the method used is to clear the contents of the cell)
If you do not indicate what method or characteristic of the object you are referring to, then the editor will assume you are referring to the default. In case of Range that is Value (which is the most common default setting). The Object Browser in the VBA Editor (F2 Windows, CTR+CMD+B Mac) gives a comprehensive overview of all the objects available and all pre-defined characteristics and methods they have. Also notice that each time you write the name of an object in the VBA editor followed by a dot, the editor will automatically list all its available options.
Cells object
In this example we have used an object we did not see before, which is “Cells”. This is a very straightforward way of pointing to cells in the Excel worksheet. Cells(i,j) indicates the cell with row i and column j. We did not indicate the worksheet on which we are working though, which could lead to problems if the macro is ran from another worksheet. You can see this if you select another (empty) worksheet in Excel and then run the macro. The names that show up in column E are now all “Yes” as it compares empty cells in column D with empty cells in column B. Hence they are always the same.
To solve this problem we should indicate the sheet name before “Cells”. Each time we use a cell we would have to say Sheet1.Cells(i,j). To avoid having to write repetitively “Sheet1.” each time when using Cells we can make the programming more efficient by applying the With statement.
With statement
The With statement is an efficient way of indicating to which object a piece of code refers. In our example we are always working with the cells on Sheet1. Applying the With statement we could indicate just once it is Sheet1 we are working with. The example would thereby change as follows:
Option Explicit
Option Compare Text

Sub CompareWithForNextAndIfThen()

    'dimension the variables to go through the lists
    Dim RowRandom, RowPrimary As Integer

    With Sheet1
        'go through the list of random colours
        For RowRandom = 1 To 10
            'for each random colour go through the list of primary colours
            For RowPrimary = 1 To 3
                'if is a primary colour write yes and leave the for loop
                If .Cells(RowRandom + 4, 4) = .Cells(RowPrimary + 4, 2) Then
                    .Cells(RowRandom + 4, 5) = "Yes"
                    Exit For
                End If
            Next RowPrimary
            'if the random colour is not identified as primary then write "No"
            If RowPrimary = 4 Then
                .Cells(RowRandom + 4, 5) = "No"
            End If
        Next RowRandom
    End With

End Sub
Now we can run the macro from any sheet in the workbook and the code indicates on which sheet we want to execute the code.
I should add a note on what Sheet1 in this example represents. This is the name of the worksheet that initially also has
the same caption on the tab of the worksheet in the Excel view. However we are referring to the obect name itself, not the tab
caption you see in the Excel view.
To understand the difference we can change the caption on the tab of the sheet to “PrimColTest”. Then look at
the Project Explorer in the VBA editing window and you should see the same as in Figure 2 below:
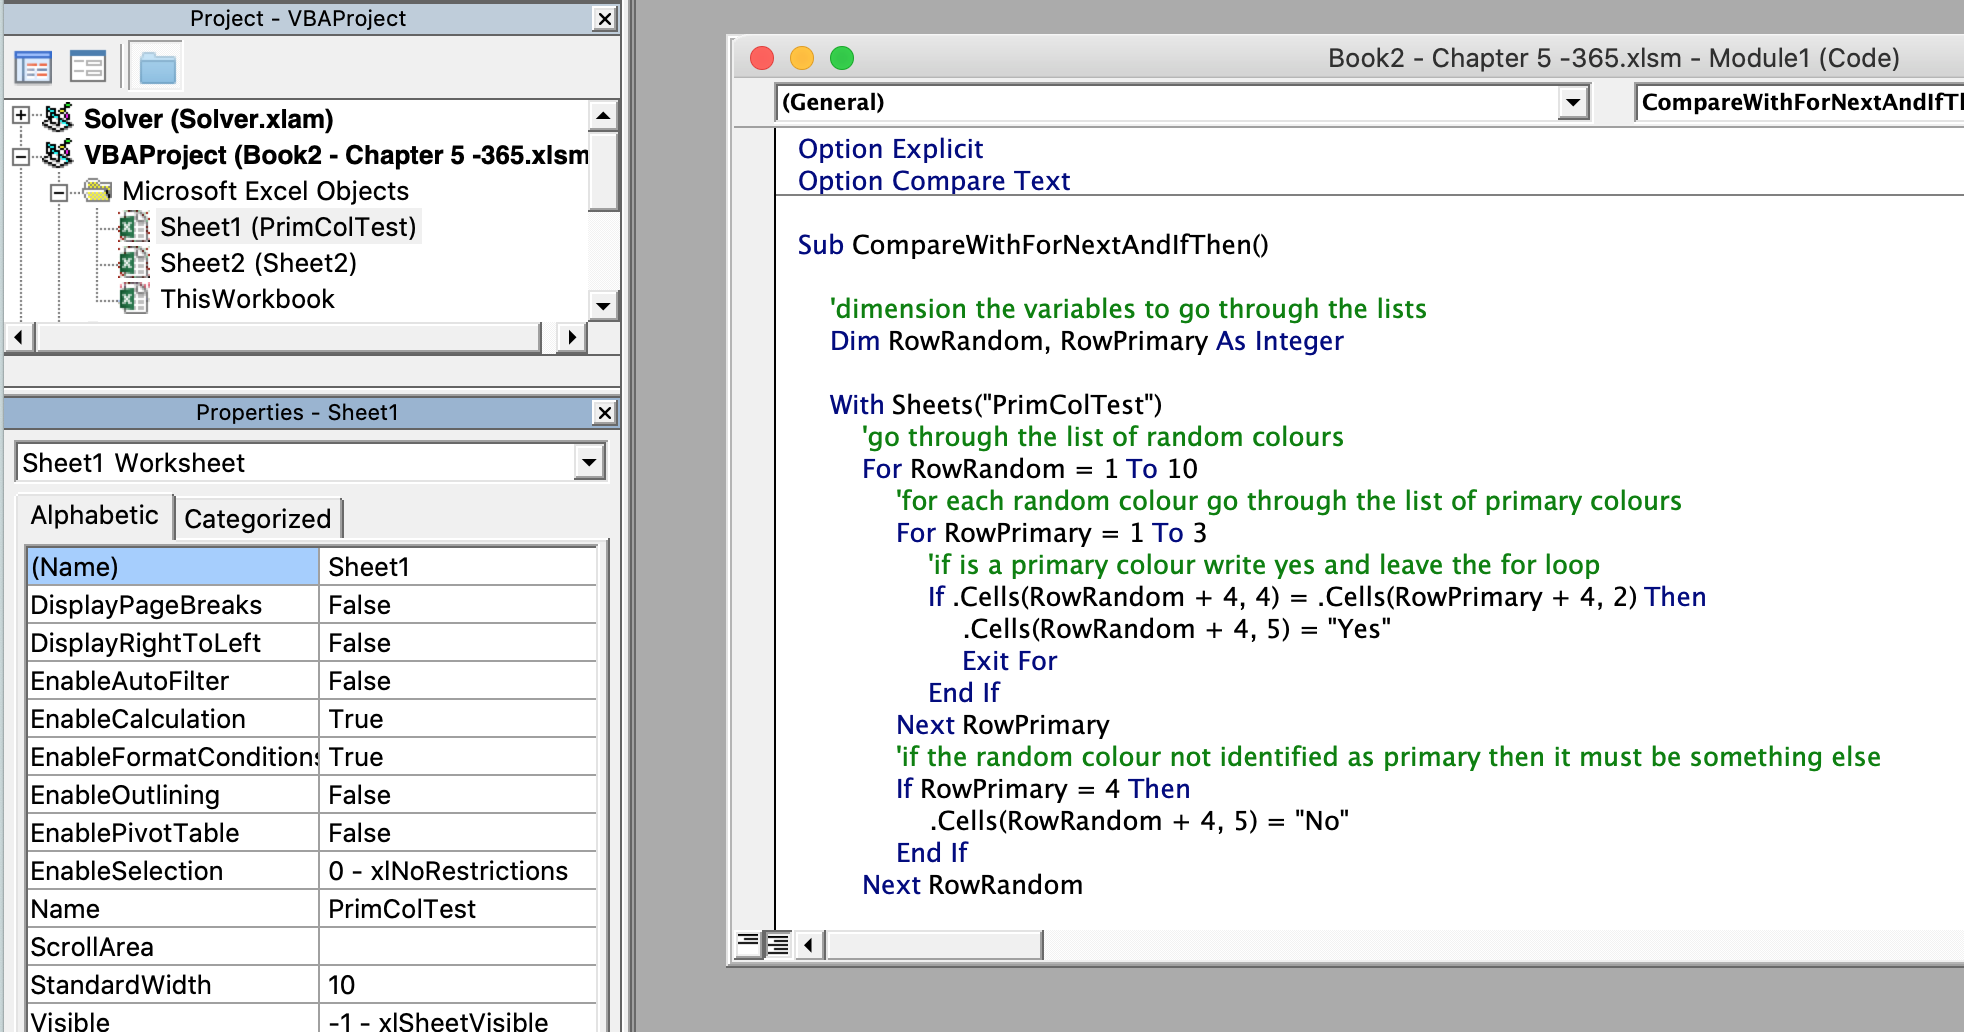
Here top-left in the Project Explorer you can see the object name (Sheet1) in the explorer tree, with behind it in parentesis the name as on the tab of the worksheet in the Excel view (PrimColTest). If you run the macro again it shoud still work as we did not change the object name. Would you want to refer to the name as on the caption of the sheet tab, then you can replace in the code Sheet1 with Sheets(“PromColTest”) as I did in the code in Figure 2.
Constants
The code we have up to now is full of different numbers. And that is while it is still a very small macro. Imagine we add a column between column A and B. Then we would need to change all the numbers that refer to columns in the code (I think 4 references to columns here). When your code becomes bigger it becomes undoable to adjust your code like that without a huge risk of errors as you might accidentally miss a few references. The solution is to use constants by which you can identify all your numerical fixed values at one place. When we would use constants in our example the code will look like this:
Sub CompareWithForNextAndIfThen()

'define the constant numbers that are used in the macro
Const ColPrimary = 2
Const ColRandom = 4
Const ColResult = 5
Const HeaderRow = 4
Const NumRowsPrimary = 3
Const NumRowsRandom = 10

'dimension the variables to go through the lists
Dim RowRandom, RowPrimary As Integer

With Sheet1
    'go through the list of random colours
    For RowRandom = 1 To NumRowsRandom
        'for each random colour go through the list of primary colours
        For RowPrimary = 1 To NumRowsPrimary
            'if is a primary colour write yes and leave the for loop
            If .Cells(RowRandom + HeaderRow, ColRandom) = _
            .Cells(RowPrimary + HeaderRow, ColPrimary) Then
                .Cells(RowRandom + HeaderRow, ColResult) = "Yes"
                Exit For
            End If
        Next RowPrimary
        'if the random colour not identified as primary then write "No"
        If RowPrimary = NumRowsPrimary + 1 Then
            .Cells(RowRandom + HeaderRow, ColResult) = "No"
        End If
    Next RowRandom
End With

End Sub
Now, if there is any change to the layout of the sheet where we find our inputs and put our outputs, we can change the references to the location in the first part where all constants are defined. As all the references to the sheet are together it is much easier to make the adjustment. And while the location may be used several times in the code you only need to change it once. Also, the code becomes more readable as there are no more “mysterious” numbers but more descriptive names.
When writing the code with the constants it became clear to me though that the first If... line becomes too long to be viewed on the page and had to be spread over two lines (I generally prefer descriptive names over very short but unreadable ones). The next paragraph explains how that works.
Command continuation on next line
When writing code in VBA and you find one command line becomes too long as you cannot see all of it anymore, or when printing it would run of the page, then you can use the underscore symbol (“_”) to spread the command over two lines. You cannot just use enter to divide your command line without further warning as the compiler expects to find complete commands on one line. The “_” tells the compiler the command continues on the following line. As in the example above, the correct use is to put first a space, followed by the “_” symbol, and then press enter.
While… Wend & Select Case combined
After these many asides above we shall now change our code to work on the basis of While… Wend and Select Case statements. We will use the opportunity to show that with strongly different code you can obtain the same result. The VBA solution we built here is:
Sub CompareWithForNextAndIfThen()

    'define the constant numbers that are used in the macro
    Const ColPrimary = 2
    Const ColRandom = 4
    Const ColResult = 5
    Const HeaderRow = 4
    Const NumRowsPrimary = 3
    Const NumRowsRandom = 10

    'dimension the variables to go through the lists
    Dim RowRandom, RowPrimary As Integer

    'indicate where to start checking the random colours
    RowRandom = 1

    With Sheet1
        'go through the list of random colours
        While .Cells(RowRandom + HeaderRow, ColRandom) <> ""
          'check the value of the random colour
          Select Case .Cells(RowRandom + HeaderRow, ColRandom)
              'if it is a primary colour write "Yes"
              Case "blue", "yellow", "red"
                  .Cells(RowRandom + HeaderRow, ColResult) = "Yes"
              'else write "No"
              Case Else
                  .Cells(RowRandom + HeaderRow, ColResult) = "No"
          End Select
          RowRandom = RowRandom + 1
        Wend
    End With

End Sub
The first feature of the code above that I would like to underline is that we start initialising RowRandom, setting it to 1. Then we have the While… Wend statement which executes the comparison to the primary numbers until it finds the empty cell after the list of random colours. Said differently, the While… Wend continues as long as the cell value is not empty, indicated by <>"". This test could equally be written as:
While Not .Cells(RowRandom + HeaderRow, ColRandom) = EmptySecondly, note the primary colours are here defined within the Select Case and no reference is made to the sheet for their input. As the set of primary colours is fixed it is appropriate to define the set in the code. And finally, before the Wend line is a command that increments RowRandom. Essential, because if omitted the code would execute infinitely as it would never find the empty cell (hit Ctrl+Break on Windows or Opt+Cmd+Esc on Mac to stop code execution at any time).
In this case we do not need to change the code if we have more random colours, we can just add them to the bottom of the list. A disadvantage is though that code execution will stop if there is an empty line between the random colours.
Next: Chapter 6: How to use Arrays