Excel VBA Tutorial Chapter 3: Condition statements
Goal of this chapter
This chapter will familiarise you with condition statements. A condition statement is a test if a certain condition is met or not. Using conditions will direct the macro execution in a certain direction, depending on the test and the inputs. The VBA elements we discuss in this chapter are:
- If… Then… Else… Statement
- Command Button
- Option Compare Text
- Nesting of statements
- Drop down lists
- Select… Case… Statement
Starting this chapter the tutorial provides the VBA code examples in 'code highlighted' text instead of images of the code. This will enable you to copy the code from the webpage to your VBA editing window. However, writing everything yourself instead of copy-pasting is recommended as it supports your learning. The Prism code highlighting I use is based on Visual Basic, so will look very similar to what you see in you VBA editing window.
If … Then… Else… Statement
Probably one of the tools you will use most in Excel VBA programming is the If... Then... Else… statement. It is applied when there are only two possible states: a test result is either true or false. The VBA form is similar to the IF function in Excel (keywords in italics):
If the condition is met Then do one action Else do another action and finish with End If.
Where I say “the condition is met” that is equivalent to “the test result is true”. Let's start a practical example. We'll make a condition statement that indicates if a certain day is a Friday or not. Open a new Excel workbook and type in cell B3 “Day” and cell B5 “Friday?” (both without quotes). We will use cell C3 for input of the name of a day and cell C5 for the result. Write “Saturday” (without quotes) in cell C3 as an initial input.
To make the programming easier we can name the input and result cells. First click on cell C3 and then click on the “Name Box” (top left) and write “DayInput” (without quotes) and enter. Click cell C5, then click the “Name Box” and write “Result” (again no quotes) and enter. Please refer to Naming Excel Ranges in Chapter 2: How to write a macro for more information on naming ranges in the Excel worksheet.
Then go to the VBA editor, either pressing ALT+F11 on Windows or Option+F11 on Mac, or through the menu go to “Developer -> Visual Basic”. Insert a new module in the Workbook and write the following code in the module:
Sub DayTest()

    If Range("DayInput") = "Friday" Then
        Range("Result") = "Yes"
    Else
        Range("Result") = "No"
    End If

End Sub
The test between the If and Then could also use other operators as e.g. >, <, >=, or >< to say “not equal to”. In case you only want to do something if the condition result is true, then you just need to leave out two lines: the one starting with Else and the next line where “No” is assigned to “Result”.
Note that when writing the code I start the lines with the If, Else and End If keywords one “tab” indent from the left of the page, while the text written within these lines of the If statement jumps in two tabs. This visual form of ordering the programming code will be useful especially later on, when the code becomes more complex and more difficult to read. The indents provide clues when reading the code what is going on, for example from where to where the code runs that will be executed in case the If test is true. As a rule fo thumb, you should use the indenting rule that each time you apply a statement or structure that opens and ends on different lines, that all lines inbetween jump in one tab more. In this case: between Sub and End Sub and lines between the If, Else and End If statements. To test if the macro works you can press “F5” or click the “Run Sub” button in VBA editing window (Play symbol).
For ease of use we could add a user-friendly button to run the “DayTest” macro from the spreadsheet. Here I will demonstrate the use of the Command Button. However, this is an “ActiveX Control” which is only available on Windows. So if you are a Mac user then please use here the Button as described in Chapter 1 instead to run “DayTest” (after testing it works you can continue from below section Option Compare Text).
To insert the Command Button, return to the Excel worksheet view, and go to the Control Toolbox via “Developer ->
Insert -> ActiveX controls -> Command Button”.
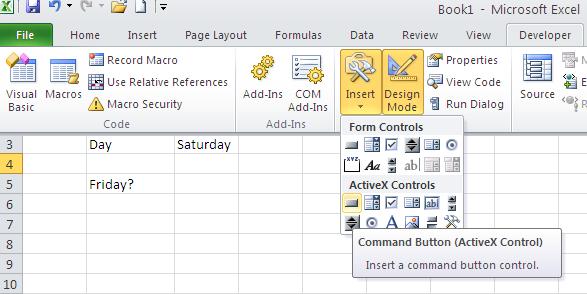
Click anywhere on the sheet to add the Command Button, e.g. in cell E2. If you right-click on the Command Button and go to “Properties” you can change its text in “Caption”, click the text and write “Run Daytest” (no quotes). Next, right-click again on the Command Button and go to “View Code”. There you should write between the “Private Sub Commandbutton_Click()” and “End Sub” lines the word “DayTest” (without quotes), exactly the name we gave earlier to the sub that tests if the day is Friday. This “calls” the sub and the sub will be executed each time you click the Command Button.
Currently we cannot click the Command Button and run the code as we are still in “Design Mode”. Excel switched to Design Mode automatically when you added the Command Button. To exit Design Mode we click “Developer -> Design Mode”. Now, when you press the Command Button the macro should run and return “No” to cell C5.
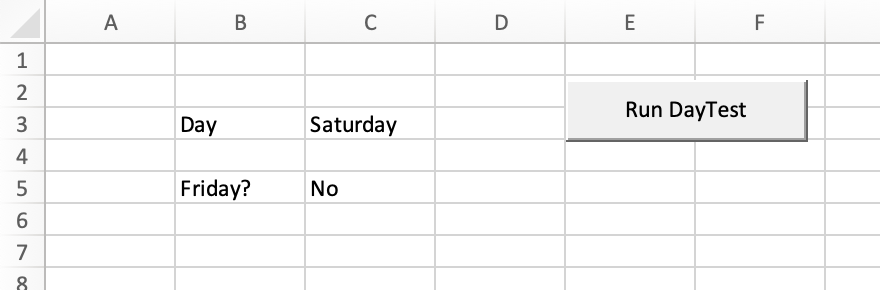
Try changing cell C5 to Friday or something else to see if it comes up correctly with “Yes” or “No”.
The “Command Button” we have just added is different than the “Button” we added in Chapter 1. The Button is much more restricted in its flexibility when using with VBA code. Therefore, in more complex VBA programming I generally prefer the Command Button over the Button as it is more flexible and its functioning and look can be changed by VBA code (of course that is if I am programming and running the Workbook exclusively in Windows). The whole list of Command Button characteristics you can see in the “Properties” window can be set in VBA.
Option Compare Text
While testing the macro in the previous paragraph you might have noticed that the macro only returns “Yes” in case “Friday” is written exactly like that, including correct lower and upper case. As it is not always desirable that the text is compared to a predetermined value on a case sensitive basis, you can apply Option Compare Text at module level (as with Option Explicit, before opening any sub). In case you use Option Compare Text the macro will not distinguish anymore between upper and lower case letters and only compare if the letters are the same.
Nesting of statements
The “nesting” of statements refers to using one statement within the other. In case of our If… Then… Else… statement we would be nesting if we would have another such If statement between the Then and Else or between the Else and End If of the first (that is, within one of the outcomes of the test).
For example, instead of testing if it is Friday we could test if it is weekend. In that case we can program the following:
Option Explicit
Option Compare Text

Sub DayTest()

    If Range("DayInput") = "Saturday" Then
        Range("Result") = "Yes"
    Else
        If Range("DayInput") = "Sunday" Then
            Range("Result") = "Yes"
        Else
            Range("Result") = "No"
        End If
    End If

End Sub
We have nested a second If statement within the Else outcome of the first. In this way we can do two tests. If it is not Saturday we can test for Sunday. To test if it works, switch to the Excel worksheet again and press the (command) button (for completeness also change in cell B5 “Friday?” to “Weekend?”). Additionally, you can see the effect of using the Option Compare Text statement as testing the weekend days in only lower case letters should now also return“Yes“
We could also have solved this problem to identify the weekend without nesting two If statements, by instead applying the Or operator in the test:
Option Explicit
Option Compare Text

Sub DayTest()

    If Range("DayInput") = "Saturday" Or Range("DayInput") = "Sunday" Then
        Range("Result") = "Yes"
    Else
            Range("Result") = "No"
    End If

End Sub
In other cases it is also possible to use the And operator, equal to the use in Excel worksheet functions.
Drop down lists
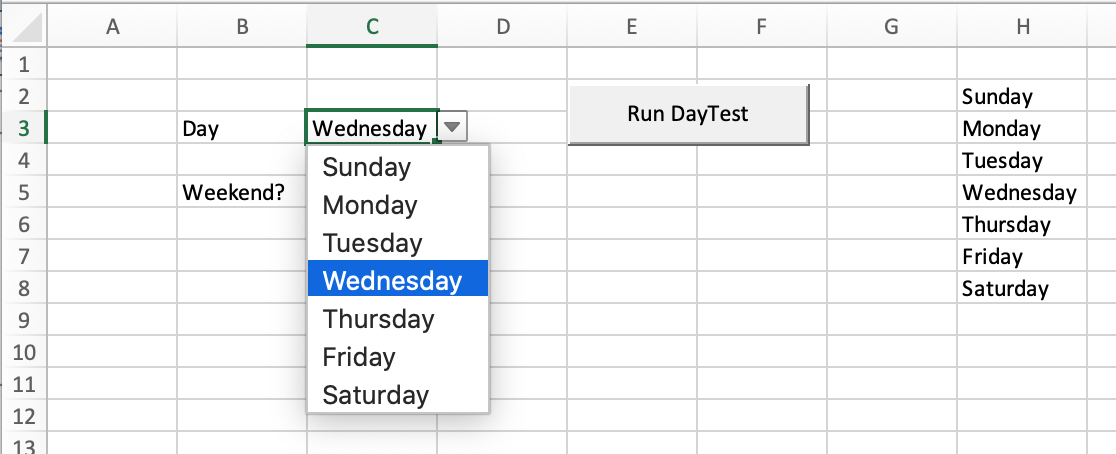
A small practical aside here on drop down lists, a convenient way to let the user manipulate the input in the Excel sheet. When programming the above test we suppose the user knows that the name of a day of the week is the required input. And also we suppose the user always spells correctly (or makes the same mistakes as we do). To limit the input choice of the user and thereby limit the chance of errors and make the macro more robust, it is handy to use the drop down lists available from the “Data Validation” option in Excel.
To add this tool to our example first we need to define the options. Starting in cell H2 and working down we write all the days of the week. Then select cell C3 (also called “DayInput”) and go in the menu to “Data -> Data Validation” and in “Allow” choose “List”. Select the list in cells H2:H8 and press OK. You will now see that when you want to change the input in cell C3 that the worksheet only offers you the options indicated by you.
Select Case statements
Another much used condition statement is Select Case. While the If statement is used if there are only two possible outcomes of a test (true or false), the Select Case is more convenient to use when there are several possible values and different actions are to be taken for specific values. We can again write a macros to identify the weekend, but now applying the Select Case statement.
Option Explicit
Option Compare Text

Sub DayTest()

    Select Case Range("DayInput")
        Case "Saturday"
            Range("Result") = "Yes"
        Case "Sunday"
            Range("Result") = "Yes"
        Case Else
            Range("Result") = "No"
    End Select

End Sub
Instead of writing two lines for Saturday and Sunday we could also have combined them on the same line by writing:
Case "Saturday", "Sunday"As we are working with strings (text) we cannot use operators to distinguish cases like >,<, >=, etc, but when working with numbers you certainly could use those operators in the Case lines, thereby for example assigning different actions to different ranges of numbers. The Case Else works the same as the Else of the If statement. Generally the key difference between the If and Select Case statements is that in the Select Case statement you typically first find multiple lines of Case before the Case Else.
Concluding this chapter
In this chapter you have seen two of the most used condition statements in Excel VBA. We applied them here to only a single input. To make the macro more powerful and automate tasks we need to apply conditions multiple times to different inputs and then take specific actions dependent on each input. To do this we first need to look at the other building block: how to repeat the execution of a set of code several times. This is the subject of the next chapter.
Next: Chapter 4: Repeat statements