Excel VBA Tutorial Chapter 2: How to write a macro
Goal of this chapter
In this chapter we will see how to write a macro from scratch. It is useful, but not indispensible to first have gone through Chapter 1: How to record a macro. In this chapter we will discuss the following Excel VBA elements:
- VBA editing window
- Modules
- Option Explicit
- Subprocedure
- Common errors when compiling or executing
- Variables
- Declaring a variable
- Naming Excel ranges
VBA editing window
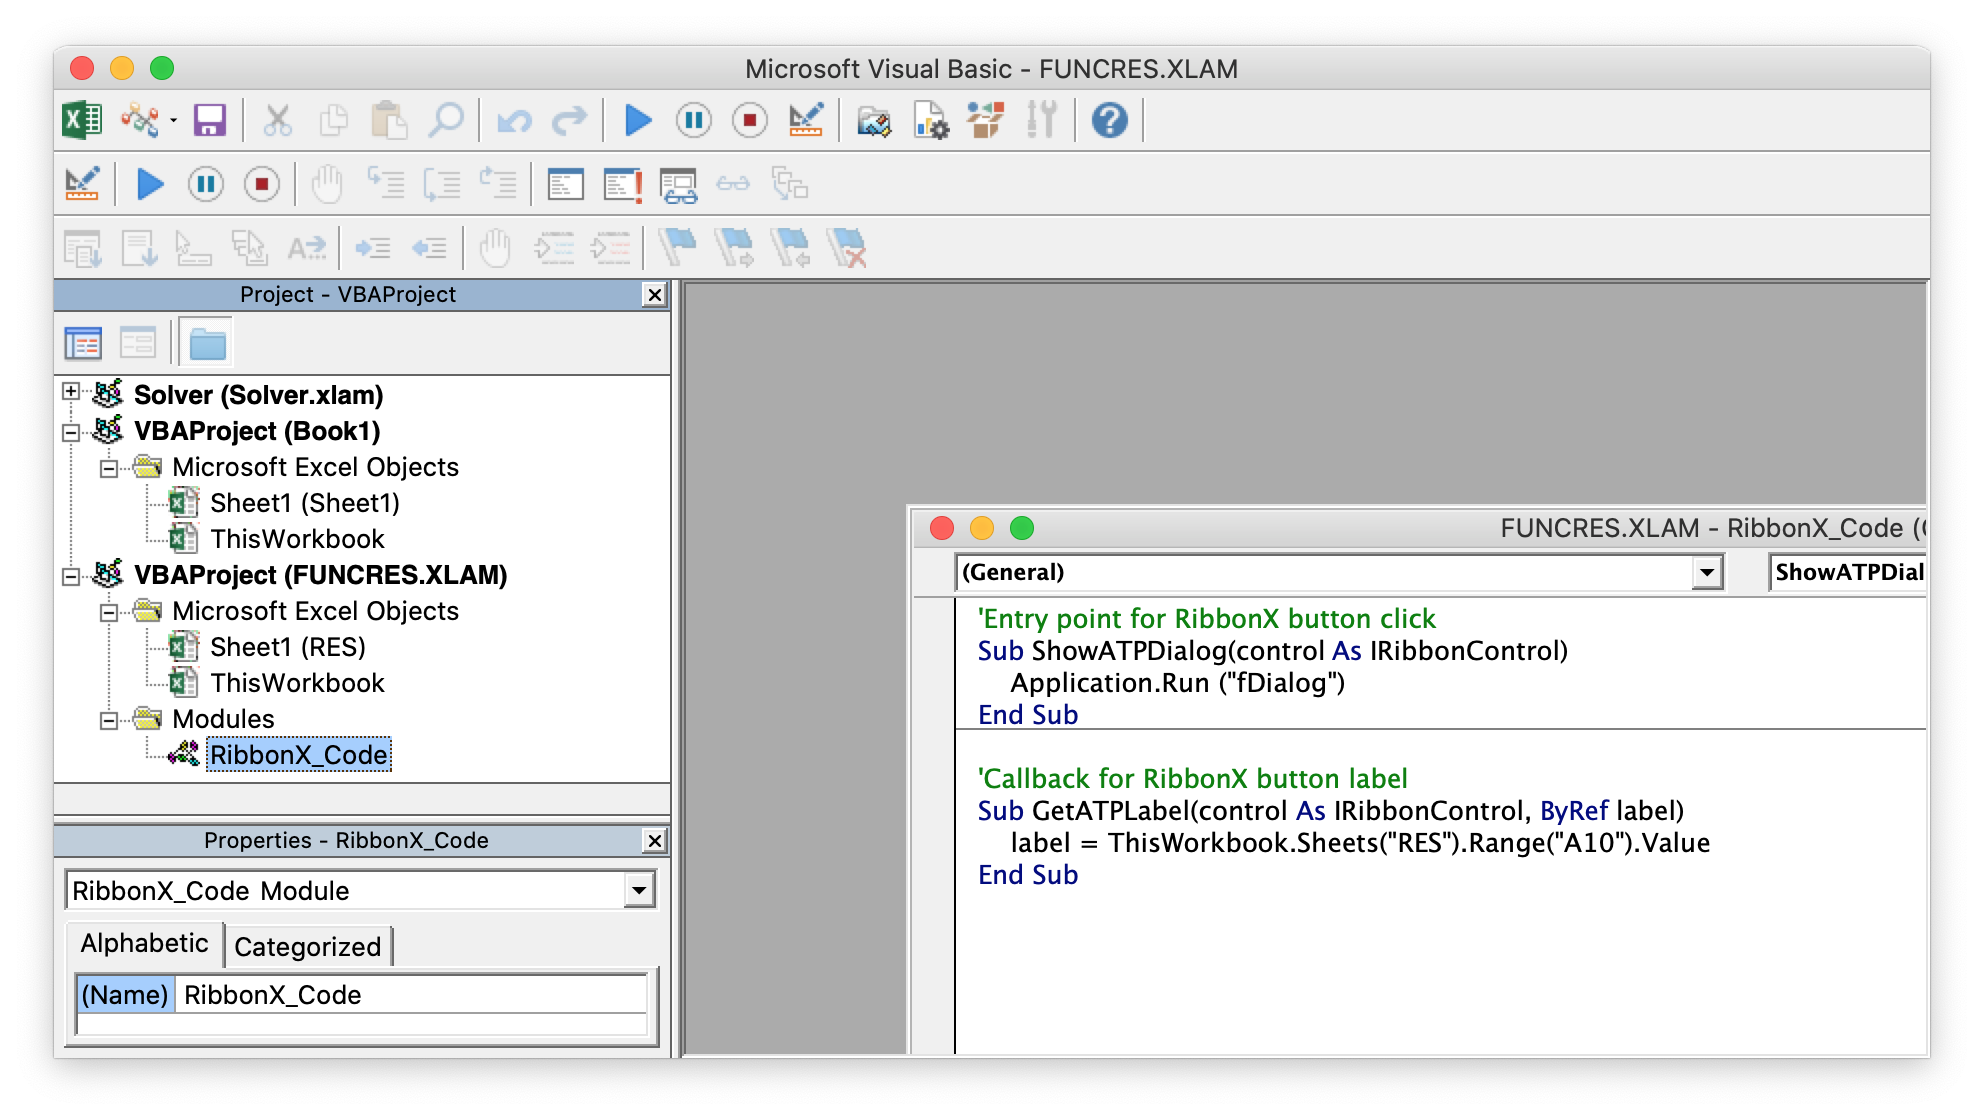
Open a new Excel workbook and access the VBA editing window by pressing Alt+F11 on a Windows computer or Option+F11 on Mac. Alternatively, you can go to the “Developer” ribbon and choose “Visual Basic”. The VBA editing window shows empty, or as below with a module open from FUNCRES.XLAM. If so, you can close that module‘s window, we will not use it. If you have any issue accessing the VBA editing window then have a look at the Preparations section in the Introduction.
Modules
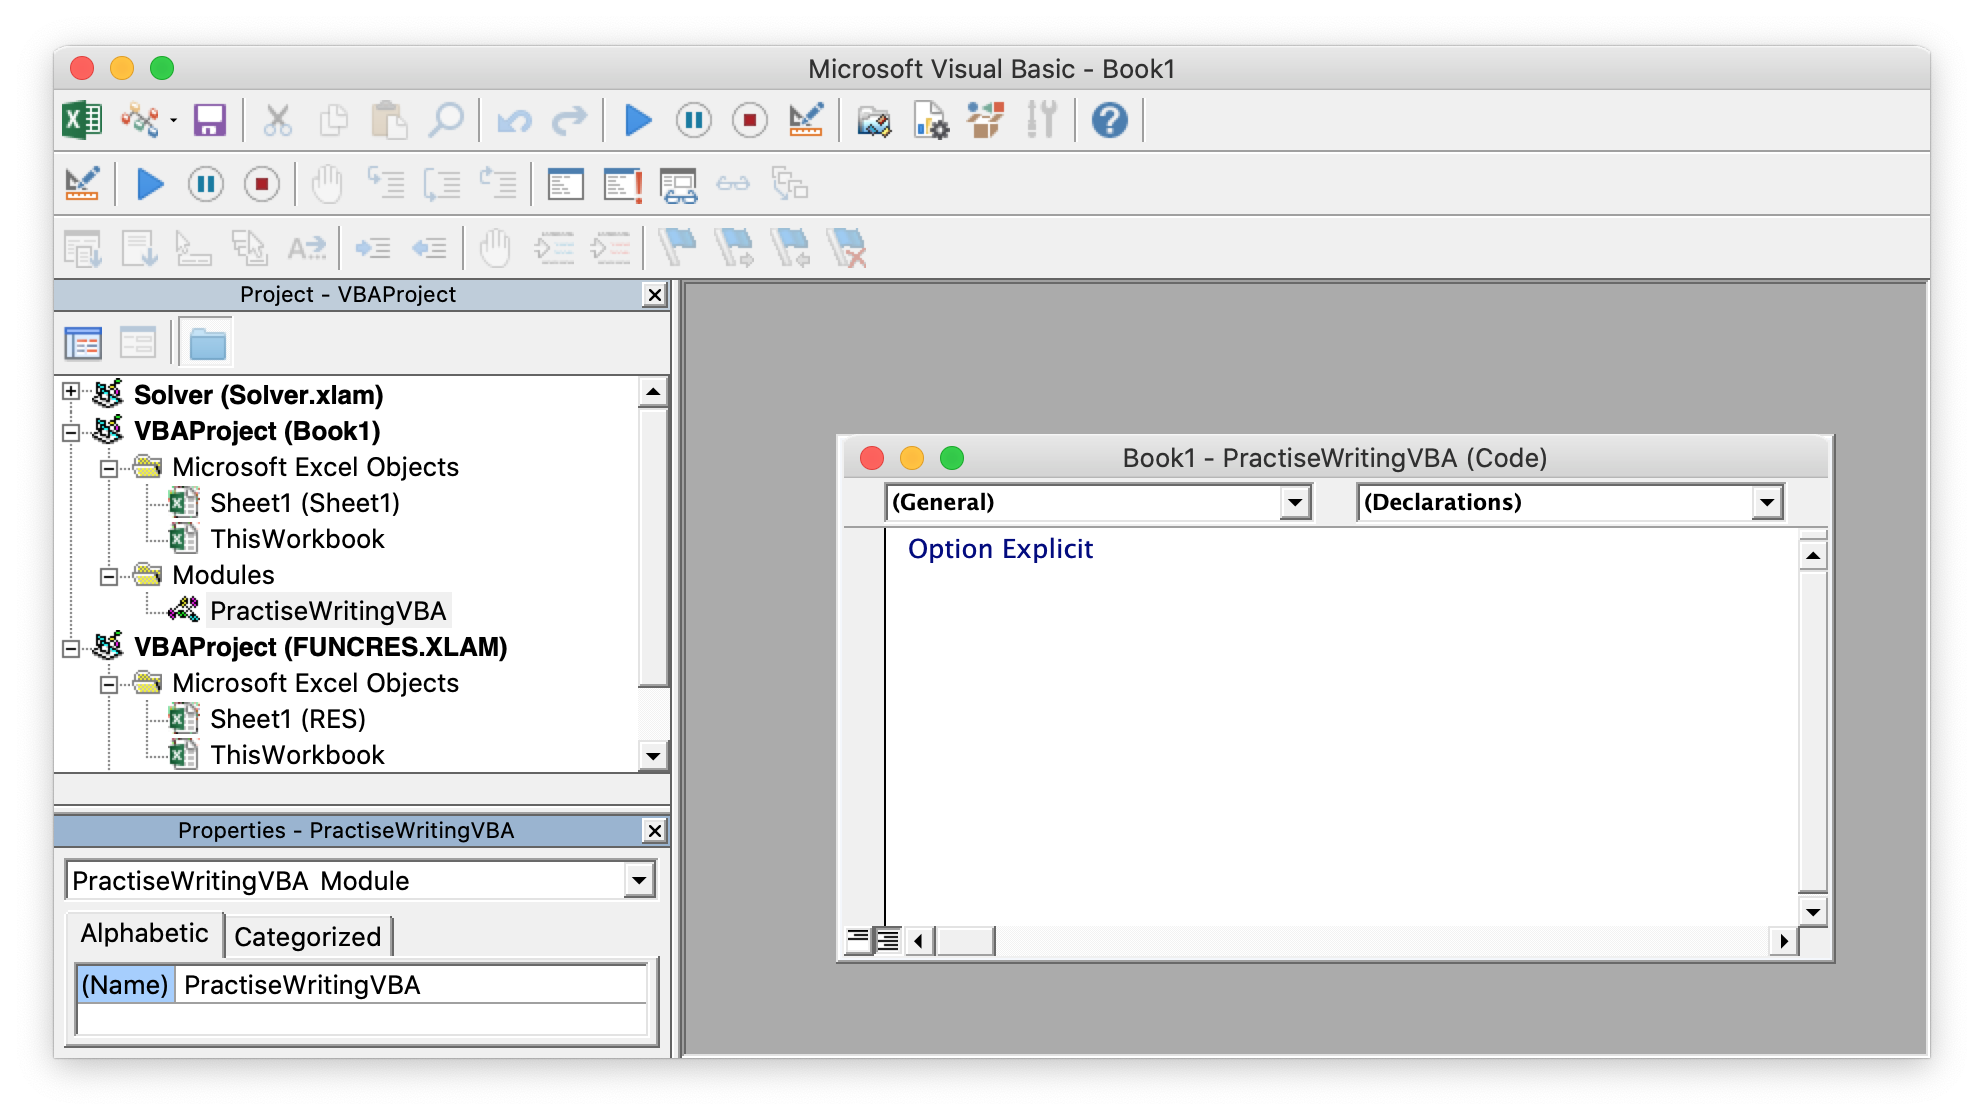
To start working on a new macro we first need to create a module. A module is a sheet in which you can type the programming code. First, select any line within ”VBAProject(Book1)“ in the Project Explorer window on the left-hand side. Thereby the module we will create will be located within this new “Book1” Workbook. Then create a new module by clicking the “Insert -> Module”. A clean sheet now appears in the main window. Depending on your settings it possibly states “Option Explicit” at the top. To rename the module press F4 (F6 for Mac users) or go to "View -> Properties Window". Let’s name the module “PractiseWritingVBA”. If that all went well the VBA editing window should look as below.
Option Explicit
Option Explicit is a module-level statement, which means it holds for all the programming you do in this module. Writing Option Explicit at the top of a module means you have to define (“declare”) all variables used in the module. This is good programming practice as it prevents possible mistakes in your macros, for example if you inadvertenty misspell the name of a variable (more about variables later in this chapter).
If Option Explicit doesn't show up automatically at the top of your new module then you can type it yourself on the first line of the empty sheet. If typed correctly it turns blue (may be rather dark color of blue). All reserved keywords recognised by the editor turn blue. Also the first letter of each reserved keyword should automatically turn to a capital letter if you initially typed all in lower case letters. The term “reserved keyword” means that Option Explicit is something that has a predefined function in Excel VBA and can only be used for the predefined purpose. So in case you wanted to use a reserved keyword the colour and capitalising let you know you have spelled it correctly. Or, if you didn’t want to use a reserved keyword, it indicates you would need to use other words.
If you want Option Explicit automatically in your newly created modules (recommended), then go in the VBA editor to “Tools -> Options -> Editor” (on Mac: “Excel -> Preferences... -> Editor”) and tick “Require variable declaration”.
Subprocedure
In the module you have to write the programming within different groups of code. Generally the objective of a group of code is either to execute an action or to return a value. The type of code that executes an action is a “Subprocedure”, while a “Function” returns a value (like the functions in the Excel worksheet). When writing a macro the main basis will be the subprocedure which we will see first. How to use functions is discussed in Chapter 7.
To start a new subprocedure type “sub” (anywhere below Option Explicit) followed by a space and the name of the subprocedure. In this case type “sub WrittenMacro” and hit enter. The result on your screen should be the following:
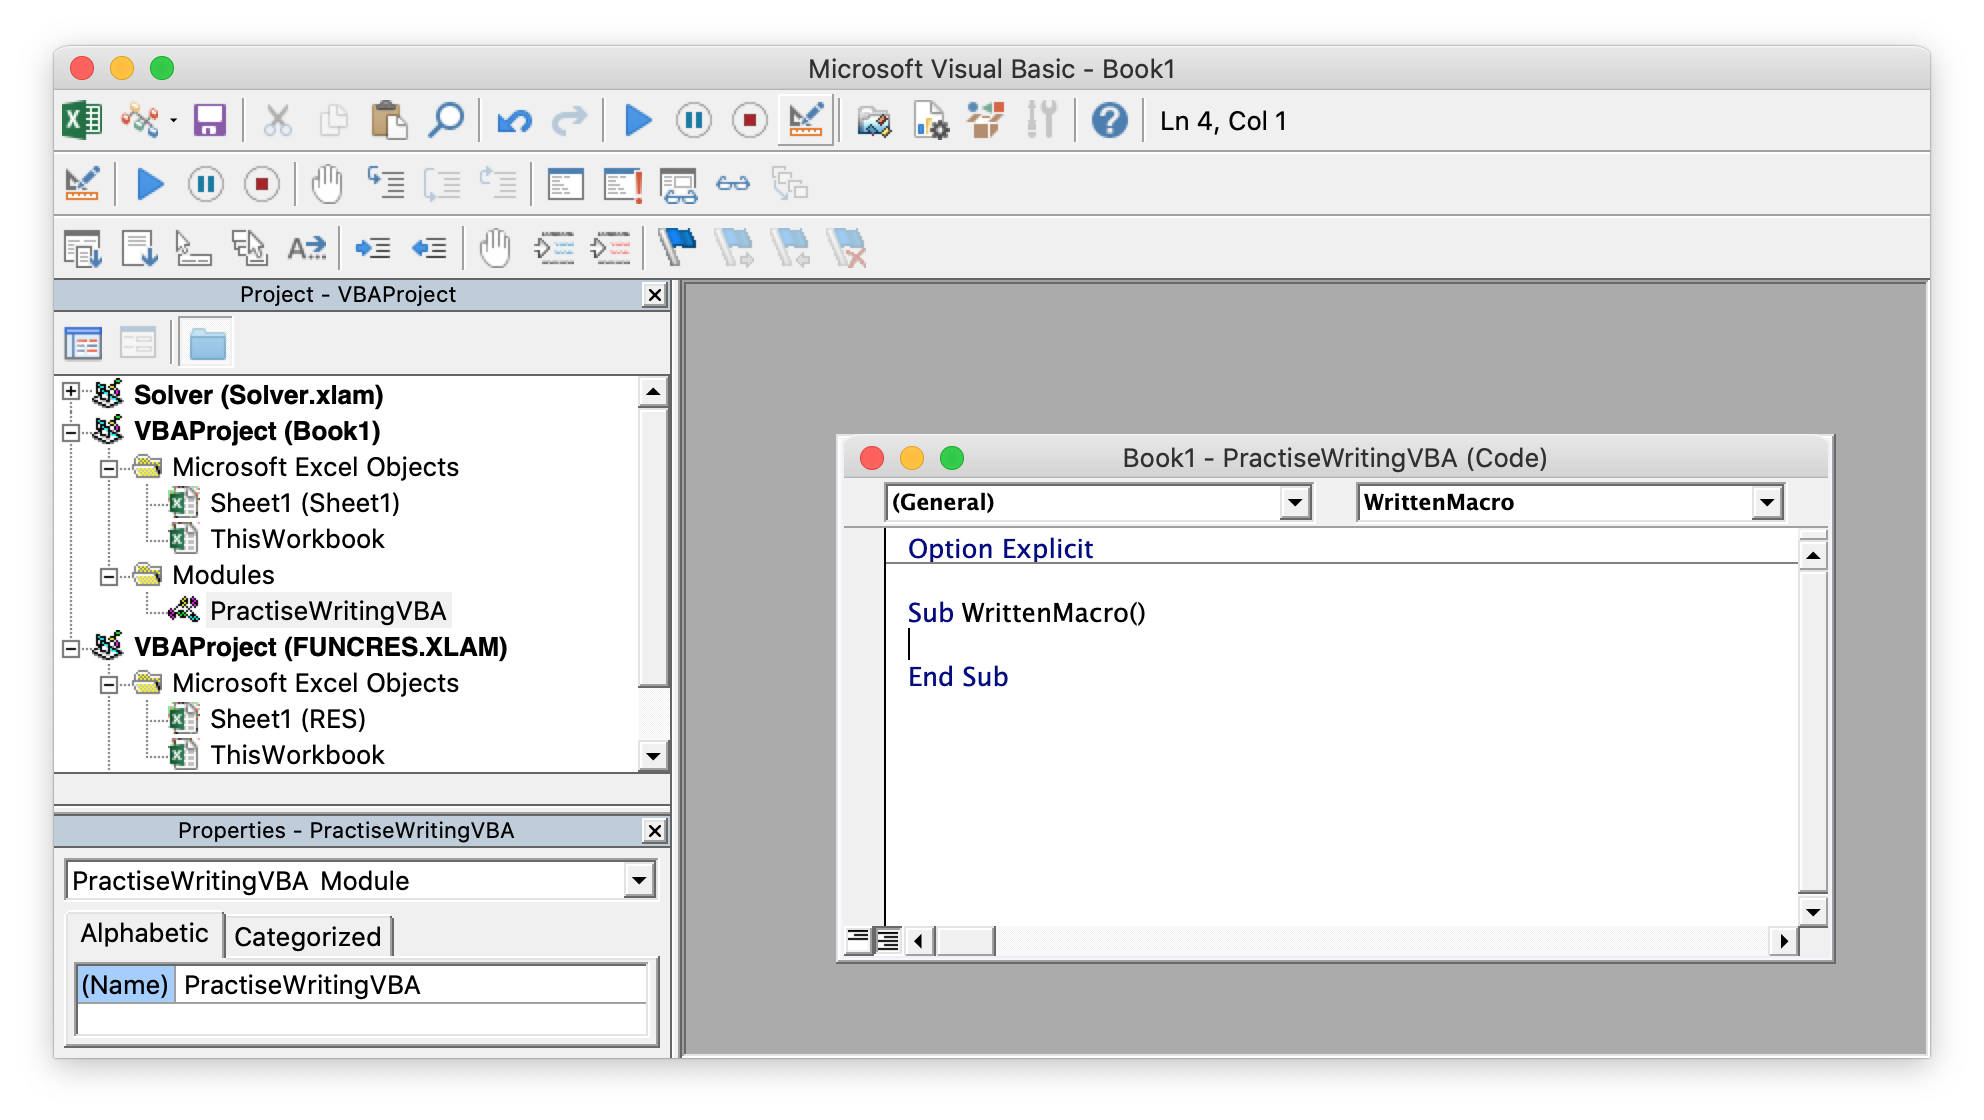
The VBA editor immediately created the “End Sub” line when you hit enter. In case of WrittenMacro it deliminates the programming code you want to execute when running the WrittenMacro routine: anything written between the “Sub” and “End Sub” lines. Imagine you would have several subprocedures in your VBA Project then it enables you to execute only a specific part of your code. In contrast to "End Sub" appearing automatically here, in subsequent chapters you will see that for most statements in Excel VBA you not only need to write where it starts but also where it ends.
Copy & Paste
Let’s write in this subprocedure the same action that we recorded in Chapter 1. What we want to do is that the value from cell B3 is copied to the range B6:F14. Instead of recording we will now write the following code anywhere between the “Sub” and “End Sub” lines:
Range("B6:F14") = Range("B3")And that’s it! You have just written the whole macro! What is essential to recognise in this one programming line is that we use an equal sign and assign the value from right to left. Whatever is on the right-hand side will be assigned to the contents of what is on the left-hand side.
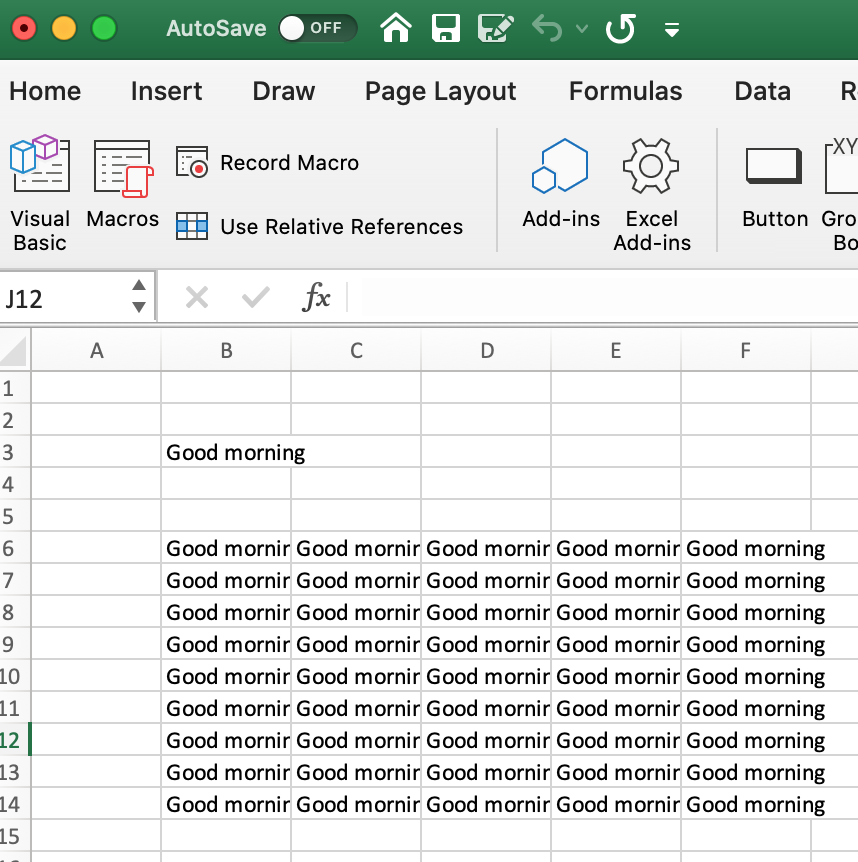
To test if it works we need to write something in cell B3. For example write “Good morning”. To run the macro there are several options.
- While you are in the VBA editor and within the lines of the subprocedure the sub will run if you press the F5 key.
- While in the standard Excel worksheet view you can go to “Developer -> Macros” (shortcut ALT+F8 for Windows and Option+F8 for Mac), select “WrittenMacro” and click “Run”.
Do any of the two above and the result on your Excel worksheet should be:
Common errors when compiling or executing
Should something go wrong while compiling or executing the VBA code in this tutorial then either one of these events is likely to happen:
- An error message comes up with "Compile Error" or "Run-time Error". This respectively means that something was not properly defined or an unexpected event happened while executing the code. When this occurs, press "OK" in the error notification window, identify the issue and correct the code. Once corrected you can rerun the code as described above. If you were to leave debugging before re-executing the code you can click the "Reset" button, the square button in the VBA editing window.
- If the message "Run-time error '1004', Message 'Range of object '_Global' failed" shows up it is because the VBA code execution cannot find the object you are referring to. This happens often if you have several workbooks open and did not define in which one the range is located that is being referred in the VBA code (like we do in this tutorial). The VBA execution will look at the active workbook. Apart from changing your code and making it more explicit where the referred range is to be found, the quick solution is to ensure you are in the correct workbook (and in this case even the correct worksheet) when executing the code in the Macro window or before switching to the VBA editing window.
- The code is executing inifinitely. In case you have made a logical error in the VBA code, particularly while creating repeat statements as described in Chapter 4, this is often the result. To stop the code execution hit Ctrl+Break or press the "Break" button, the pause button in the VBA editing window (should your system allow you to).
Comparison to recorded macro
In Chapter 1: How to record a macro we have recorded a macro that performs exactly the same action that we have programmed here. We called it “RecordedMacro”. It is instructive to see the difference between the recorded macro and the written macro. The two codes are:
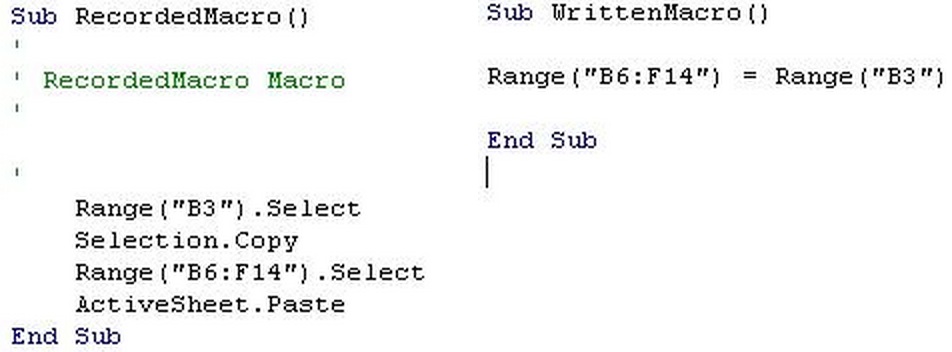
Whereas the “Recordedmacro” includes each and every action we performed manually for the copy pasting, we tried to write as little as possible in “WrittenMacro”. Whereas “RecordedMacro” literally states copy & paste lines, in “WrittenMacro” we have just assigned the value of B3 to B6:F14. In general, written macros are more efficient as they need a lot less lines and are therefore quicker to execute, which will become relevant when you make large VBA routines with many iterations or repetitions.
Variables
Variables are another vital element of programming in Excel VBA that we treat in this chapter. A variable is a named storage location that has one particular value. You could think of it as a drawer that has a name on it. For example, in my desk I have a drawer with “Greeting” on it. Inside the drawer is a note with one particular greeting, e.g. “Hello”, “Good morning”, “Good evening”, etc.
Variables are a very convenient way to transport data through a macro. The variable (the drawer) remains the same and can be reused endlessly while we can keep changing its contents.
In our example we can use a variable as an intermediate step when copying the value of cell B3 to B6:F14. We will first put the value of B3 in a variable before assigning it to the range. Therefore we first need to determine what type of variable it is. The type determines what kind of value it represents e.g.: an integer or decimal number, a word of TRUE/FALSE (Boolean). Some of the most commonly used data types are:
- Integer: small whole numbers, between -32,768 to 32,767. Use the Long data type for possible greater Integer values (also Excel dates are Long).
- Single: non-rounded numbers with some forty digit precision, use the Double type for more precision (more than 300 digits).
- Boolean: contains either TRUE or FALSE.
- String: text, in a string all words and numbers are seen as text.
- Variant: the variant data type can hold any type of data. If you do not assign a data type when declaring a variable it will automatically become a Variant.
If you look for “Data Type Summary” in the VBA Help you will find a complete list of available data types (to access the help, press F1 while in the VBA editing window or click the question mark symbol in the menu). Always try to use data types that define your variables as narrowly as possible so you will have fewer problems to detect errors in your programs and your programs will run faster if you use data types that use less storage. Use the Variant data type therefore as little as possible.
Declaring a variable
Once we know the type of variable we want to create we can define the variable, called “declaring” in Visual Basic. There are three statements that can be used to declare a variable:
- Dim: can be used to declare a variable in a subprocedure or at the module level. If used to declare a variable in the subprocedure then the variable can only be used within that subprocedure. If declared at the module level the variable can be used in any subprocedure in that module, but not by any subprocedures in other modules in the workbook.
- Public: is only used at the module level and makes the variable available to all procedures in all modules of the workbook.
- Private: is applied to declare variables at the module level that can only be used within that module. Therefore it is the same as using the Dim statement at module level (Dim is more commonly used in that case, though Private would arguably result in more transparent code).
As with the data types discussed in the previous section, it is good practice to declare the scope of variables as narrowly as possible to avoid issues later on. Here we will declare the variable in the subprocedure with the Dim statement. To declare the variable you start with "Dim", give it a name (“Greeting” in this case) and add the data type. So, write between the “Sub” line and the only code line the following “dim Greeting as string” (without quotes) press enter and the result should look like:
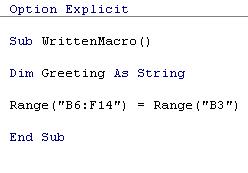
Remember that reserved keywords show up in blue and capitalised to indicate you have written them correctly. In this case the words “Dim”, “As” and “String” should show they are keywords.
A variable always needs to be declared in a line preceding (by any amount of lines) the line where you first use it. So, now we
defined the variable we can use it in the Sub. Let’s pass the value from cell B3 first to the variable “Greeting”
and then to range B6:F14. In order to do so rewrite the subprocedure as follows:
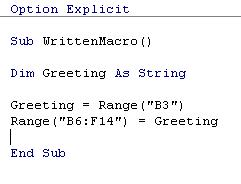
Again, to assign a value you have to read from right to left. To see if it works, change the value in cell B3 to “Good evening” (without quotes) and run the macro either by pressing F5 while in the subprocedure in the VBA editor or, when in the Excel worksheet view, go to the Macro window by pressing ALT+F8 (Windows) or Option+F8 (Mac). The cells in the range B6:F14 should now have changed to “Good evening”.
Instead of using cell “B3” as input for Greeting we can also write in the Sub what value we want to assign to it. If we want to assign “Hello” than you can replace Range(“B3”) with that value in the code:
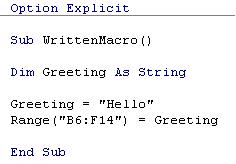
Note that I have written in this case “Hello” with quotation marks in the code as it is a String. The double quotation marks differ strings from variables. As “Greeting” is a variable it is not written with quotes in the code. Numbers are never written in the code with quotation marks as a number can never be a variable (and a number written between double quotation marks will be seen as a string). Run the macro again to see that it works. You will observe that cell B3 has not changed as we now have only changed B6:F14 to “Hello” without doing anything with cell B3.
Naming Excel Ranges
Though the naming of Excel ranges might not be a VBA feature directly, it is undoubtedly important enough for well-organised programming to dedicate the last paragraph of the chapter to it.
In the Excel worksheet the user can give cells other names than the initial letter & number format (“A1”, “C23”, etc.), in order to make them easy to reference in Excel formulas, but also in VBA. Personally, if a cell contains the value of a variable to be used in VBA, then I like to give the same name to both the variable and the cell in the worksheet. For our example that means I would call cell B3 “Greeting”. If a range is not one cell, but a set of adjacent cells, it can be named in the same manner.
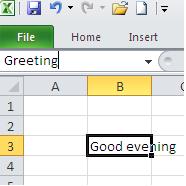
To name cells in the Excel worksheet, first select the cell or range of cells you want to name and then go to the “Name Box” on the left in the “Formula Bar”, the tool bar right above the worksheet. When you click the name box you can fill in another name. In our example, if we first select cell B3, then click in the name box, we see we have the text “B3” selected and can overwrite it. Write “Greeting” (without quotes) in the name box and press enter. Now you can see selecting cell B3 that it is called “Greeting” while the cells around it still have the letter & number format.
To name a cell directly in the name box is only recommendable for unnamed cells. If you have already named a cell and you want to delete the name, change it, or use it somewhere else then go to “Formulas -> Define Name” (or something similar depending on the Excel version you are using), because entering a name in the name box only adds a name, it does not delete the previously assigned name.
Continuing our example after this aside, we can now use in “WrittenMacro” the reference to Range(“ Greeting”) instead of Range(“B3”). This keeps the code more readable, especially if you have many variables where you obtain the value from the Excel sheet and you want to ensure each variable points to the right range in the worksheet. The macro using the named range to assign a value to the variable “Greeting” becomes:

One last advantage I will mention on using named ranges: when you move a named cell in the worksheet (e.g. cut & paste a cell or insert/delete a row or column before a referenced cell) the VBA reference goes with it. If you do not give a specific name to the cell you are referencing, and the cell moves, the macro needs to be updated manually to change the reference to the new location (not efficient and error prone).
Next: Chapter 3: Condition statements